 |
|
Recipe
and easy to follow steps to make home
baked Toasted Sesame Bread.
It
tastes better than any bread you can
buy!
It takes
about 4 hours with preparation and cleanup,
BUT most of the time is actually wait time,
where the yeast is working and not you. The
result is so rewarding that you won't mind
the time spent. Also, if you follow my
advise at the end of this page you can make
the process much more efficient and will
have to bake less often.
|
|
 |
|
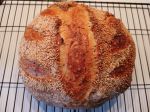
Besides a great taste of toasted sesame
seeds the bread is very moist and fluffy,
yet strong enough that it doesn't fall apart
when you spread something on it that's a
little tougher than margarine.
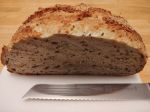
The first day I'll keep the fresh bread
out on the counter on a cutting board, cut
side down. This will keep it fresh and the
crust crunchy, but after a day or two I'll
put the rest into a plastic bag to prevent
it from drying out.
But now to the actual bread baking:
|
|
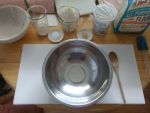 |
| I use stainless steel bowls
but also plastic bowls, both work fine. I have
replaced the shown wooden spoon for stirring
with a metal one as it's easier to clean. I
started out with using 5 lbs. bags of Bob's Red Mill all-purpose
flour, but then later switched to 20
lbs. flour bags from Costco. Besides that
you'll need a 9" proofing basket and a
plastic scraper, and a silicone spatula. You'll
also need kitchen scales, best digital, that
can be switched to grams instead of oz. You
also need precise scales to measure the small
amounts of yeast and salt, a pocket scale will work
great for this. Of course you'll need a 6-7 quart dutch oven, if
you don't already own one, this will be
largest investment, but you won't regret it
and it saves a lot of money in the long run. |
|
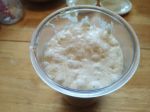 |
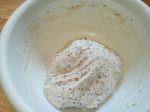
The poolish, or
pre-ferment, should be started about 16 hours
before starting the dough. I usually start it
at 4 pm to start making the dough the next day
at 8 am.
Put 150 g of cold water into a container with lid. The
container should be at least 0.5 liter in
size, better 1 liter/quart.
Put a pinch (40-50 grains) of rapid rise dry yeast
into the water and stir it.
Then add 150 g of all-purpose flour
and stir until all the flour is wet and has a
even consistency.
Let sit, covered, for 16 hours at room
temperature. |
|
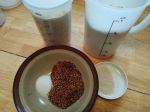 |
The needed ingredients:
The poolish you made the day before.
30 g of toasted sesame seeds. I toast
them in a small frying pan with lots of
stirring.
9 g of salt
2 g of rapid rise yeast
350 g of all-purpose flour
50 g of whole wheat flour
280 g of warm water, but not hot water as
that would kill the yeast |
|
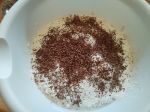 |
Put the water into the bowl, add
the yeast and stir. Then add the poolish and
stir a little to mix some of the water into the
poolish. After that cover the water with the
flour and add the sesame seeds and salt. Try to
somewhat evenly spread the salt to avoid having
too much in one spot.
Adding the salt to the water with the yeast
would kill the yeast, but adding it on top of
all the other ingredients is fine. |
|
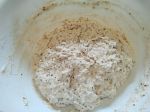 |
Mix all ingredients in the
bowl with a spoon until it's hard to mix it any
further. Then use your bare hands to mix it some
more, until everything is evenly mixed, about
one minute. Then let sit covered for 30 min.
This is the most messy part, wet your hands with
cold water to make the dough stick less to your
hands, but it still will at this stage. |
|
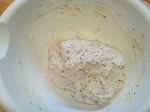 |
| Uncover the bowl and wet you hands
again. Then grab part of the dough, pull it
up 6-8 inches and fold it onto the
remaining dough. Pull it up enough that the
dough doesn't rip apart. Turn the bowl a
little and repeat it in a different spot. Do
this 6-7 times all around. You'll notice that
the dough is already a lot less sticky. Let
sit covered for 30 minutes. |
|
 |
| Repeat the step above and
then let sit covered for 1 hour. |
|
 |
Lightly flour a work surface, or
larger cutting board. Leave part of the area
without flour.
Scrape the dough from the bowl onto the
floured surface. |
|
 |
Flour your dry hands and put a
little flour on top of the dough.
Then grab part of the dough, pull it up 4-6
inches and fold it onto the remaining
dough. Pull it up enough that the dough doesn't
rip apart. Then repeat it in a different spot.
Do this 4-5 times all around. Then grab the
dough on both sides, pull up and fold to the
middle. Do this 3-4 times all around. If you see
large bubbles you can squeeze and pop them as
they will create large holes in the bread, which
I personally don't like.
Then flip the dough upside down onto the not
floured area, with the "seam" you just created
down. Then turn the dough a little while pulling
down a little, several times. Not pushing the
dough down, but rather pulling the top surface
down and tucking it underneath itself. This
creates surface tension and will give you a
smooth and round surface on the top. The pulling
and tucking isn't complicated but needs some
practice to make it easy. |
|
 |
Use a baking brush to put a little
water on the dough, just enough to make the top
moist and a little sticky again. If you use too
much water the dough will later stick to the
proofing basket.
Spread some sesame seeds on your work surface,
un-toasted as they will toast while baking.
Take your dough ball and roll it in the
seeds, with the sticky side down.
Then place the dough into the lightly
floured proofing basket, with the seeds
down.
Let sit for 30 minutes, not covered.
Now it's time to start preheating your oven to
460°F. Have the dutch oven with lid in your oven
while preheating so that it preheats too. |
|
 |
Flip the dough from the proofing
basket onto parchment paper, so that the
seeds are up. You can also put it directly into
the dutch oven, but I think with parchment paper
is easier and saver with the very hot pot. I cut
the parchment paper into a cross to avoid the
paper bunching up too much and deforming the
bread.
Score the dough with a sharp knife, about
1/2" deep, to allow it to rise easily. You can
pick any pattern you like for scoring. |
|
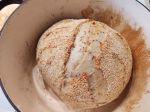 |
Take the preheated dutch oven out
of the oven and remove the lid. Take the dough
on the parchment paper and lower it into the
dutch oven. Put the lid back on and put it pack
into the oven. Do this quickly, but not in a
huge rush, to not let the pot cool off too much.
Bake at 460°F for 18 minutes.
|
|
|
|
Then take the dutch oven out of
the oven, remove the lid and pull out the
parchment paper. Place the dutch oven without
lid back into the oven. Bake at 460°F for
another 25 minutes.
Take the bread out of the dutch oven and place
on a baking
rack to cool off. If you can stand
it, let it cool off at least one of hour before
cutting it. If it is too fresh, still too warm,
it won't cut well |
|
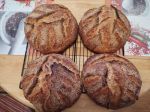 |
| Later I thought, well, there would
be enough room in the oven for a second dutch
oven. So I bought a second dutch oven and second
proofing basket and started making two loaves of
bread at the same time. |
|
 |
After that I figured that with
investing just another 45 minutes, I could make
two more loaves. The timing gets a little more
complicated, but with enough timers or a
multi-timer app, it's possible.
You'll ask what I do with four loaves of bread?
After the loaves are cooled off I cut them in
half, place them in 1 gallon freezer bags and
freeze them. Bread freezes very well and this
way I don't need to bake every week. |
|
